System requirements
Glossary of Terms
How to use the program:
Beginners
(Please read)Output image settings (image size, resolution, alignment marks, type, arrangement)
Troubleshooting
Tiff files |
PhotoProjector Database Save
| Banding in Interlaced Image
|
Other Issues | Final Images do not work
with LenticularScreen
Your Images
Don't load multilayered and compressed TIF.
Even if your TIFF files look like they contains only 1 layer, if you originally saved them before
deleting extra channels (saved lasso selections or masks), they are considered multi-layered and may not work.
Test the TIFF file is not multi-layered by performing a Photoshop test save as a .jpg file. If Photoshop
reports it must be saved as a copy only, then it is likely you have not deleted extra channels made when saving
masks and lasso selections.
The PhotoProjector Databases
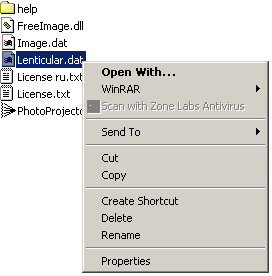
If you can't save the changes in Lenticular or Image database, change the properties of Image.dat and
Lenticular.dat files. Use Window Start button by right clicking on it and select 'Explore. Navigate the
menu to locate these files: Lenticular.dat and Image.dat which will be in the same directory as PhotoProjector.exe
Place your mouse cursor over the file name in the file tree structure and click the right button of mouse, choose
Properties from the drop-down menu...
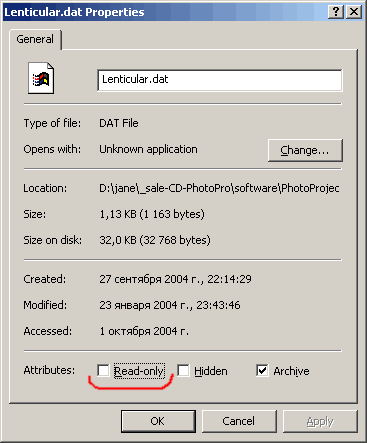
Uncheck the Read only box. Do this for both of the .dat files. The reason for this is that data cannot be written to files protected with a Read-Only flag set.
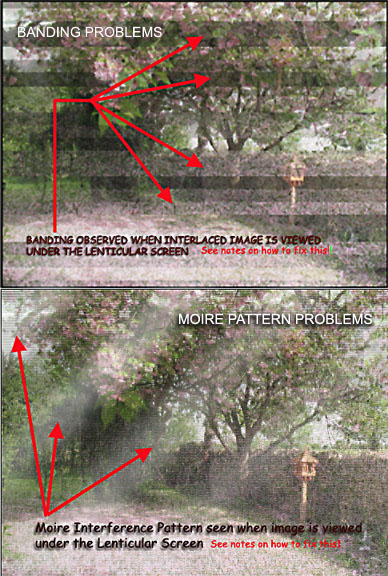
Banding or Moire Patterns in final image
If your final image appears to have interference when viewed under the Lenticular Screen it may be caused by Banding
or Moire problems.
See examples below:
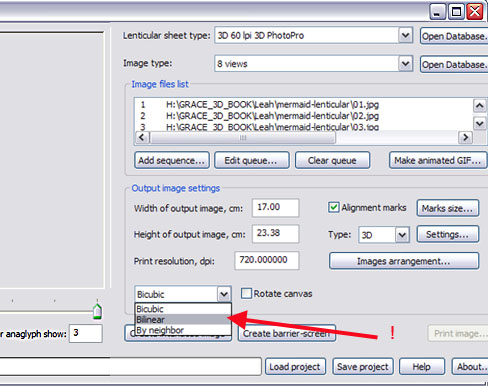
To eliminate Banding Issues (not Moire), ensure you do not select 'interpolation by neighbour'
either in PhotoProjector when creating the interlaced image or in Photoshop when possibly enlarging your original
images. Select Bilinear Interpolation!
To elimate Moire in final images
This may happen due to a mix of LPI, Print DPI, Printer resolution DPI or any number of cross-harmonics of frequency
events between printing, printer, screen, image size. If this happens, you can produce the Interlace as a partly
rotated image and print it this way (without restoring it to vertical orientation in Photoshop). Please read
carefully this help file!
Final Images do not work with Lenticular Screen
Producing a good quality Lenticular Image takes careful and error-free working. You should carefully check through
the steps you took to try and produce the image. The most likely cause of failure are:
1) Pitch Test was not performed for your printer at the correct resolution required for the final image. The LPI
number in the database was not set correctly!
Please redo the PitchTest and set the LPI correctly in the PhotoProjector Database.
2) You did not set the DPI to the Printer Resolution in PhotoProjector:
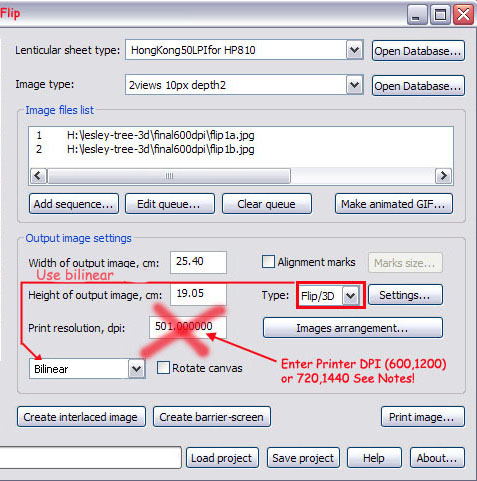
Photoprojector calculates the final Print resolution based on the TRUE LPI of the screen (the number entered by
you in the database). You need to manually enter the Printer resolution of your Printer at the desired whole number
resolution. The number must be whole and not a decimal. It must be a factor of the maximum Printer resolution.
It should be the DPI resolution you set in the PitchTest test!
So, for example... if you determined to print a final image at say 1200dpi, and you set the LPI of the Lenticular
Screen in the PhotoProjector Database based on a Pitch Test at 1200 DPI, (probably a decimal) you ignore the value
shown in Print Resolution dpi and instead enter 1200!
All values entered will be in the realm of 360, 720, 1440, 2880, etc for Epson Printers and 300, 600, 1200, 2400,
4800, etc., for most non-epson printer (Canon, Lexmark, Samsung, HP). You do not alter the true value of Lens Pitch
in the database. Keep it set at whatever value was determined from the PitchTest - normally a decimal. You merely
alter the Print Dpi (as shown in the image above) to your printers round whole number multiple.
3) You are not physically aligning the printed image to the Lenticular Screen. Thin Screens need to be in tight
contact with the print. Try putting your image on a hard flat surface, carefully place the screen on the dry print,
press down evenly and firmly once you have the screen properly aligned with the image.
4) You are not using the right type of paper in your printer or you are not setting the paper into the paper feed
tray precisely! The precision required in creating Lenticular Images so that the printed data aligns exactly with
the thin lens in the Lenticular Screen is a critical component. If you are using the wrong paper, it will stretch,
distort, or wrinkle, as it becomes wet through the ink being deposited on its surface. If the paper is not fed
into the printer straight, the image data will be distorted. Both of these conditions are undesirable and will
cause misalignment of the image with the screen. Most printers (not all) feed the paper around a roller which may
also bend and stretch low quality paper. After printing, the paper may shrink or dry and - at a tiny scale - distort
the image, causing misalignment of the image with the lenses.
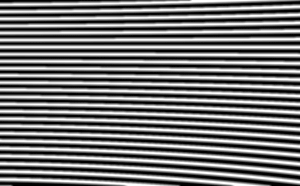
Example of Image data lines when paper does not pass through the printer
in a straight and uniform way.
Paper deformation may also occur due to air humidity changes. As a rule, paper
dries up and decreases in size. Within a week the period of image data as vertical or horizontal lines on the paper
may no longer correspond to the period position of the lenticular lenses in the sheet/screen.
How to prevent this:
Use only high quality, non-deforming paper, for example:
- KODAK Rapid Dry Photo Glossy, INTELICOAT DMPDQU-G/ High-Gloss Photo (for big plotter printing),
- Epson Premium Glossy, Office Depot/ premium photo/ high gloss/ heavy, Ilford smooth high gloss media, some
types of HP Premium paper,
- White Glossy Film is very good too. For example, Lexmark 1372361 White Glossy Film for Ink Jet Printers,
and some White Glossy Film types of Lomond, HP, and Canon.
- Ensure the paper is correctly inserted into the printer and be certain the printer is on an even flat surface.
Watch the paper as it moves through your printer to check it is not snatched, or pulled through unevenly! Level
your printer and adjust the paper stops either side of the feed tray to close up any possible chance of the paper
moving left or right in the paper tray.
Note: Higher priced, higher performance inkjets may have a flat paper-feed alternative where the paper is not curved around a roller before passing under the print head. This method of printing is preferable as the paper is not subjected to stress and will remain in its natural state.
5) Not solved! Check this Beginners Section!