System requirements
Glossary of Terms
How to use the program
Beginners
(Please read)Output image settings (image size, resolution, alignment marks, type, arrangement)
Pitch Test
Note: You will not be able to create good Lenticular Images unless you always perform a PitchTest first. Please take careful note of the following.
PitchTest.exe is a separate program contained in the same directory as PhotoProjector. You can launch
it by navigating to the directory or by clicking here! and selecting
'Run' from the dialogue window. The reason for this module is that it is critical to know how your printer prints
ink on the paper and at what frequency of dots. PitchTest is used before you try and produce any final Lenticular
Image as a test of the way the LPI (lens per inch) of your screen needs to be re-interpretated in a way your printer
can produce dots of ink aligned to where the physical lenses are in the screen.
A Screen of 50LPI means your printer has to print dots of ink precisely at 50 lines per inch. We need to understand
how your printer really prints its dots and the degree of inaccuracy to the required frequency. We do the PitchTest
to tell PhotoProject to use a new more precise value for the Lenticular Screen LPI so that when your final image
is printed, PhotoProjector understands the mismatch between Printer capability and the way the Lenticular Sheet
is designed, so the Printer puts the dots of ink in the right places to fit your Lenticular Screen for the DPI
of your final image.
Launch PitchTest.exe to determine the frequency of lenticular sheet:

- Starting Lenses per Inch, lpi - starting value of lenticular sheet frequency, this is the LPI frequency
of the top strip. So if you are say using a Lenticular sheet stated as being 50LPI, you should select a starting
frequency of 49.5 LPI.
- Step of Lenses per Inch, lpi - step of frequency increase for next strip. A value of 0.1 is best to
start with. This will produce a series of strips on the print with small lines printed with inceasing frequency
per set of lines down the page.. If you started with 49.5 (for a 50LPI screen) and the number of strips (see below)
as 20 then you will be able to test your Lenticular Screen for a frequency precision of 49.5 LPI to 51.5 LPI.
Width of strips, cm;
How wide across the paper to print a row of small lines.
Width of lenticular sheet is a good start value.Hight of strips, cm;
The length of the small lines to be printed in horizontal strips.
0.5 is a good starting value.Space between strips, cm;
The gaps between each row of small lines.
0.2 is a good starting value.Number of strips, cm;
10 or 20 is a good starting value.
- Print resolution, dpi.
You should understand the printer resolutions of your printer.
For example, an Epson printer may print at 720 or 1440 DPI (dots per inch) if it is a fairly low cost (budget) printer or 1440, 2880, or higher if an advanced printer. The resolution to set here though is based on the dpi of the image you wish to print for your screen. This will be a multiple of 360 dpi for Epson Printers and a multiple of 300 dpi for most non-epson printers: HPinkjets, HP Lasers, Lexmark Inkjets, Canon Inkjets.
Check your printer manual specifications to understand the Printer DPI resolution capability.If you intend to print your final image at, say - 1200 dpi, you must do the PitchTest at 1200 dpi.
- Background - colour of background: White or Green or Custom (click the rose button
to open the palette dialogue).
- Strips defines the width of black strips: Thin - strip in one pixel, Thick - strip in
half of period.
- Scaling: Bilinear or By Neighbour interpolation. By Neighbour is used for offset
printing. If you intend to print a flip image on a home printer, it is best to select bilinear!
- TIFF compression. Regrettably, not all graphic software can support LZW, GZIP, Packpits compression method. Make the TIFF file with None, if compressed image is not read in your graphic application.
Choose the necessary print resolution. Set values for Starting Lenses per Inch and Step of Lenses per Inch. The width of the pitch test SHOULD NOT be less than the width of your picture. Change the print settings to use a maximam resolution and the best quality. Print a pitch test. Then dry your print.
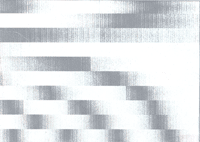
Put the printed pitch test sheet under the lenticular screen. You can see the similar picture:

The frequency of the strip which is the most continuous is close to the lenticular sheet frequency.
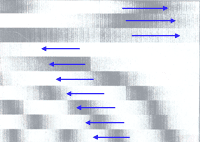
Close one eye and turn the head to the left, and then to the right. Look at the moire moving. Among the strips there are two strips where moire runs TOWARDS each other: the top moire moves from left to right, the bottom one moves from right to left (or otherwise). These two strips are close to the necessary strip.

Step1
At the beginning, set the Step of Lenses per Inch equal to 0.1 lpi. You will then determine the lenticular
frequency within a broad + or - 0.1 lpi. Make a note of the value closest to the strip where the effect stated
above is observed.
Step2
You need then to determine finer precision so you should run the Pitch test again but this time you set the Starting
LPI to a value just below the value obtained in step 1 above.
Next you set the Step of Lenses per Inch is equal to 0.01LPI instead of 0.1LPI
and run Pitchtest again to determine the lenticular frequency within 0.01 lpi.(2 decimal places).
Doing the PitchTest in 2 steps this way will give you a very precise value. If you only did just Step1, the value
obtained may not be precise enough when used as the LPI value to create your interlaced image later.
If you make a visiting or a post card, you need to determine the lenticular frequency within 0.1 lpi.
ATTENTION! Pitch test for 3D algorithm with Parallax correction differs from usual pitch testing. For usual cases you look at pitch test from viewing distance, for parallax correction you look at pitch test from very far distance, 2 or 3 meters.